Visit Stagesindoorcycling.com
Get Support
SEARCH RESULTS FOR:
"
term
"
English
Stages Solo & Les Mills Virtual Bike - Stages Solo / Les Mills Virtual Bike User Guide
Stages Solo & Les Mills Virtual Bike
/
Stages Solo / Les Mills Virtual Bike User Guide
/
Riding the bike
/
Emergency brake
Warranty Information
Maintenance
Troubleshooting
Contacting customer service
Riding the bike
Emergency brake
Fitloc adjustment
Adjusting resistance & using SprintShift
Handlebar fore/aft adjustment
Handlebar height adjustment
Saddle fore/aft adjustment
Saddle height adjustment
Toe clip adjustment
Assembly
Step 19-20: Plug in the bike & tablet setup and pairing
Step 18: Level the bike
Step 17: Remove the rubber band from the power meter & Install the pedals
Step 16: Install the tablet to the mounting arm
Step 15: Install handlebars
Step 14: Reinstall the nose cap
Step 13: Secure the tablet arm assembly
Steps 11-12: Extend and connect the cables
Step 10: Insert the tablet arm into the head tube
Step 9: Pull the coiled cable down from the tablet arm
Steps 7-8: Lower & secure the gas cylinder
Step 6: Remove the nose cap
Step 5: Install AC adapter cover
Steps 3-4: Mount AC adapter & plug into bike
Steps 1-2: Install front & rear stabilizers
Box contents
Unboxing & assembly video
Tools required
Bike diagram
Important Safety Information
Tablet lift assist
European Union lockout strap warning
Warning decal placement
Safety Footprint
Before you begin
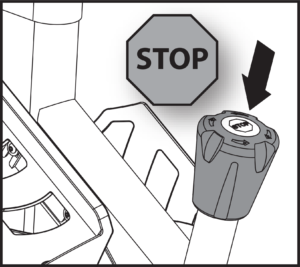
Emergency brake
Push straight down on the resistance knob to engage the emergency brake.
Previous
Next
SEARCH RESULTS FOR:
"
term
"